 1- Hello World!
- HTML, CSS, and Javascript
- Create manifest.json
- Load an extension
- Edit and refresh an extension
- Next steps
HTML, CSS, Javascript
- Like all web pages, extensions are built using HTML, CSS, and Javascript code.
- HTML (HyperText Markup Language) structures content for the web.
- CSS (Cascading StyleSheets) control the presentation of content.
- JS (Javascript) is the programming language for web pages.
- This simple example will look like:
This is a paragraph
<!-- hello.html -->
<html>
<head>
<title>Hello world!</title>
<link rel="stylesheet" href="styles.css">
<body>
<h1>Hello world!</h1>
<p>This is a <span style="color:red">paragraph</span></p>
<script src="main.js"></script>
</body>
</html>
/* styles.css */
span { color: red; }
// main.js
alert("This is a simple Javascript alert");
👉 Create the manifest file
The manifest file tells the browser how to install and run the extension code.
- Create a new folder and call it
explode-tutorial - Create a new file
manifest.jsoninside this folder. - Paste or type the example.
- Install the extension in your browser using the instructions below.
{
    "name": "My First Browser Extension",
    "description": "🐌",
    "version": "1.1.0",
    "manifest_version": 3
}
👉 Install an extension for development
Chromium Browsers
- Go to
chrome://extensions - Enable Developer mode by toggling the checkbox in the upper-right corner.
- Click "Load unpacked" and select the folder with your extension manifest file.
Mozilla Firefox
- Go to
about:debugging. - Click "This Firefox".
- Click "Load Temporary Add-on" and select any file in your extension folder.
- The extension will remain installed until you restart Firefox.
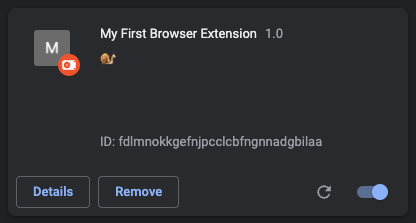
👉 Confirm the extension has loaded
- Confirm your extension has loaded at
chrome://extensions - Examine the panel for your extension to see the name, description, and version from your manifest file.
- Notice also the enable|disable toggle and reload button.
👉 Edit and refresh an extension
These are basic steps you repeat will to build and test any extension. Try updating your manifest to match the example.
- Edit and save the extension files in your code editor.
- Click the small "refresh" button at
chrome://extensionsto reload the extension. - Normally you'll refresh a test page to run the extension on that page. Let's add one now.
{
    "name": "Explode the Web! Tutorial",
    "description": "🐢",
    "version": "1.1.1",
    "manifest_version": 3
}
Part 1 conclusion
- So far we have created a project folder and manifest, and learned how to load, update, and refresh the extension in Chrome.
- You check your progress by looking at the completed files for each section, for example in
extensions/explode-tutorial-1. - 👉 Start the next section Architecture and Debugging